Dash Kit Package includes:
- Dash Kit;
- Dash Kit Diagram;
- 1-2 Isopropyl Alcohol Wipes (depending on kit size);
- 2-5 3M Adhesive Sticks (depending on kit size).
Dash Kit Package includes:
What you will need for your dash kit installation:
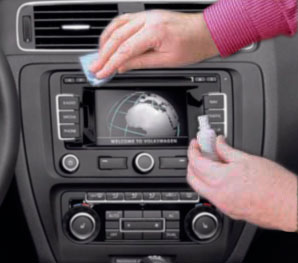
Step 1: Thoroughly clean the area where the dash trim pieces are to be applied with a clean, lint-free cloth and the alcohol swabs provided or with 3M Solvent 70*, to remove ALL residue and dirt.
Important: If a silicone protectant (such as ArmorAll) has been applied to your dashboard, this cleaning may need to be repeated 3-4 times. We use only Original 3M High Quality tape and it always stick to clean dashboard without exceptions. If not the Dashboard was NOT cleaned well.
A test can be performed for cleanliness with ordinary masking tape, if the tape sticks easily to the dash, the Dashboard is ready for installation, if not repeat the cleaning process or contact us.
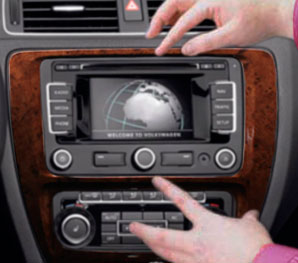
Step 2: Without removing the red backing tape, ‘dry-fit’ ALL dash trim pieces, noting correct placement, joins and angles. If needed use a pencil to outline the pieces for placement reference or use masking tape to hold it temporarily in place.
Very Important Note: ALL pieces should be checked “dry-fit” before proceeding to Step 3. Immediately stop installation procedure and contact us even if one piece doesn’t fit.
Any money back or refund requests based on fitting issues will be declined once the kit or partial pieces are installed. Only replacement and correction requests will be reviewed and accepted.
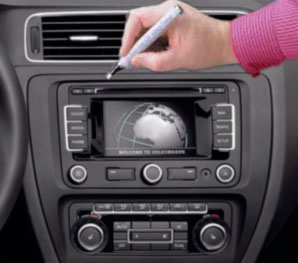
Apply the 3M Adhesive Promoter provided with our kit to the dashboard, ONLY TO SURFACES THAT WILL BE COVERED BY DASH TRIM, pay special attention to the edges of all pieces to prevent lifting.
The 3M Adhesive Promoter Stick/Sachet will dry out in approximately 7-10 min, please make sure you apply it to all required surfaces BEFORE proceeding to Step 4.
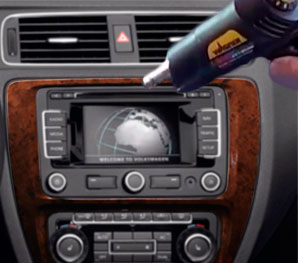
Step 4: Gently heat the dash trim part with a heat gun or hairdryer (set to low, keep the heat source at least 5″ away from the kit piece. Pieces will become flexible with application of heat. Alternately, on warm or sunny days, laying the kit in the sun for 10-15mins will have the same effect.
Placing the pieces (backing tape side down) on the top of the dash with the front window defrost set to medium for 15mins, warms & keeps all pieces ready for installation.
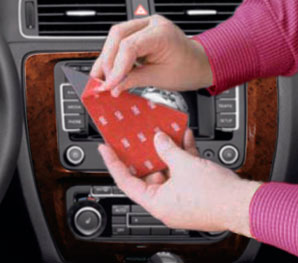
Step 5: Hold the pieces by the edges to avoid touching the adhesive surface. Partially peel back the backing tape.
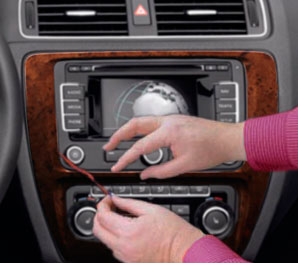
Step 6: Place in position, align correctly, and then remove the remaining backing tape.
Work from smaller pieces to larger pieces, inner to outer, making sure joins and seams are correctly positioned, and button/switch movement is not effected.
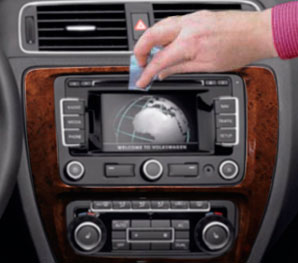
Step 7: When all pieces are satisfactorily in place, thoroughly press down on the entire surface of each piece to ensure a complete ‘wet-out’ of adhesion to the surface.
Pay special attention to corners and any pieces that curve.
Fingerprint marks can be removed with window cleaning products such as Windex or rubbing alcohol.
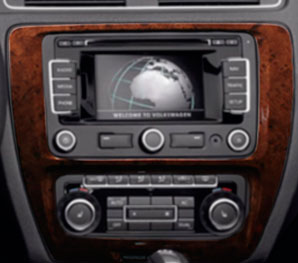
Step 8: Properly installed, dash trim adds a distinctive touch of class to the vehicle.
Enjoy our product.
While we don’t recommend another product specifically by name for cleaning your dash, you can use a chemical equivalent cleaner recommended by your local auto paint store. So long as the cleaner is a chemical equivalent, meaning the same active chemicals in the alternative are found in 3M Prep Solvent 70. DashKitMalldoes not sell 3M Prep Solvent 70 directly, however, you can purchase the cleaner at 3M’s online web site at 3M Prep Solvent 70.